
# nexus搭建maven私服及私服jar包上传和下载
一、nexus搭建maven私服及相关介绍
1、下载nexus-2.12.0-01-bundle.zip(版本随意)
2、cmd进入bin目录,执行nexus 下一步执行nexus install
3、开启nexus服务,访问nexus服务器地址:http://localhost:8081/nexus/,默认登录账户为admin,默认密码为admin123,登录成功后点击Repositories可看到私服有以下类型仓库:
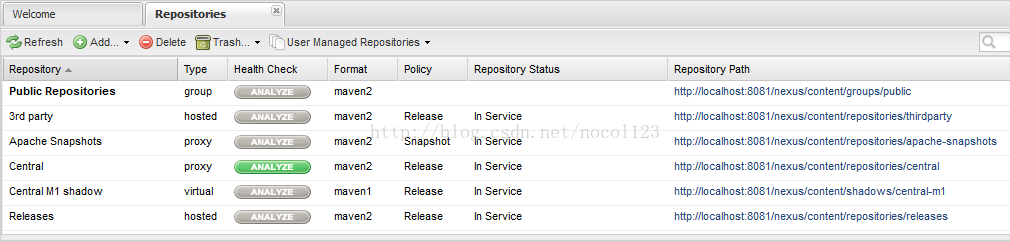
1)hosted,宿主仓库,部署自己的jar到这个类型的仓库,包括releases和snapshot两部分,Releases公司内部发布版本仓库、 Snapshots 公司内部测试版本仓库
2)proxy,代理仓库,用于代理远程的公共仓库,如maven中央仓库,用户连接私服,私服自动去中央仓库下载jar包或者插件。
3)group,仓库组,用来合并多个hosted/proxy仓库,通常我们配置自己的maven连接仓库组。
4)virtual(虚拟):兼容Maven1 版本的jar或者插件
4、nexus仓库默认在解压文件的sonatype-work\\nexus\\storage目录中:
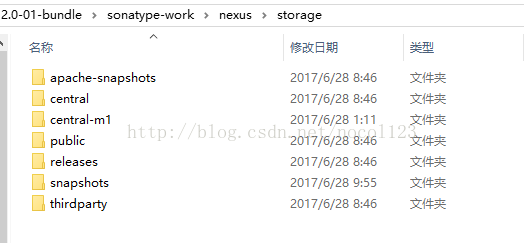
apache-snapshots:代理仓库,存储snapshots构件,代理地址https://repository.apache.org/snapshots/
central-m1:virtual类型仓库,兼容Maven1 版本的jar或者插件
releases:本地仓库,存储releases构件。
snapshots:本地仓库,存储snapshots构件。
thirdparty:第三方仓库
public:仓库组
二、向maven私服上传写好的jar
1、需求:将项目子模块ssm\_dao这个工程打包成jar并上传到私服
2、第一步:需要在客户端即部署dao工程的电脑上配置 maven环境,并修改 settings.xml 文件,配置连接私服的用户
和密码。此用户名和密码用于私服校验,因为私服需要知道上传都 的账号和密码 是否和私服中的账号和密码 一致。
在maven文件夹下apache-maven-3.5.0\\conf\\settings.xml文件添加一下代码:(节点内)
~~~html
<server> <!--releases 连接发布版本项目仓库--> <id>releases</id> <!--访问releases这个私服上的仓库所用的账户和密码--> <username>admin</username> <password>admin123</password> </server> <server> <!--snapshots 连接测试版本项目仓库--> <id>snapshots</id> <!--访问releases这个私服上的仓库所用的账户和密码--> <username>admin</username> <password>admin123</password> </server>
~~~
3、在ssm\_dao的pom.xml文件中添加一下代码:
~~~html
<!--将ssm_dao上传私服 --> <distributionManagement> <!--pom.xml这里<id> 和 settings.xml 配置 <id> 对应 --> <repository> <id>releases</id> <url>http://localhost:8081/nexus/content/repositories/releases/</url> </repository> <snapshotRepository> <id>snapshots</id> <url>http://localhost:8081/nexus/content/repositories/snapshots/</url> </snapshotRepository> </distributionManagement>
~~~
根据工程的版本号决定上传到哪个宿主仓库,如果版本为release则上传到私服的release仓库,如果版本为snapshot则上传到私服的snapshot仓库。
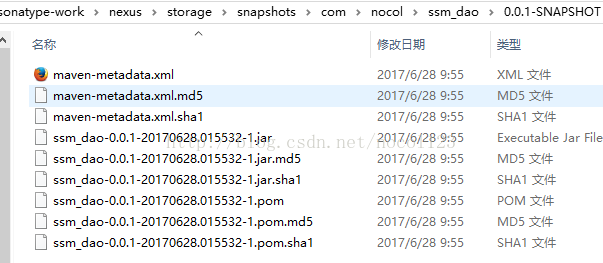
如:ssm\_dao的工程的版本号为0.0.1-SNAPSHOT,则ssm\_dao打包好的jar在本地仓库snapshots可见
~~~html
<modelVersion>4.0.0</modelVersion> <parent> <groupId>com.nocol</groupId> <artifactId>ssm_parent</artifactId> <version>0.0.1-SNAPSHOT</version> </parent> <artifactId>ssm_dao</artifactId>
~~~
4、正式上传:首先启动nexus服务,对ssm\_dao工程执行deploy命令,看到BUILD SUCCESS则表示上传成功了
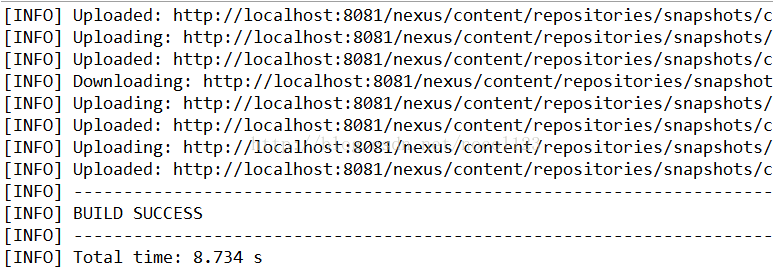
此时在\\nexus-2.12.0-01-bundle\\sonatype-work\\nexus\\storage\\snapshots下能找到,但是在本地仓库并没有,因为jar包上传在maven私服,接下来介绍如何能让自己上传的jar出现在本地仓库
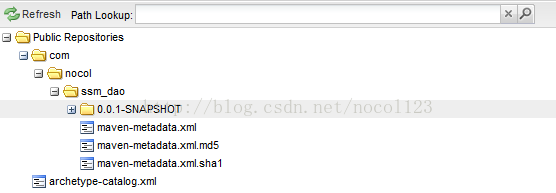
如图:(本地snapshots)
如图:(私服)
5、此时将ssm\_dao工程关闭,可以看到依赖ssm\_dao的ssm\_service工程出现感叹号(缺少了ssm\_dao.jar)
三、maven私服自动下载jar包
1、在没有配置nexus之前,如果本地仓库没有,去中央仓库下载。有了私服之后,本地项目首先去本地仓库找jar,如果没有找到则连接私服从私服下载jar包,如果私服没有jar包私服同时作为代理服务器从中央仓库下载jar包,这样提高了下载速度,项目连接私服下载jar包的速度要比项目连接中央仓库的速度快的多。
2、nexus中包括很多仓库,如上面介绍的hosted中存放的是自己发布的jar包及第三方公司的jar包,proxy中存放的是中央仓库的jar,为了方便从私服下载jar包可以将多个仓库组成一个仓库组,每个工程需要连接私服的仓库组下载jar包,这样在项目中配置下载路径只需要给仓库组路径即可,即:
http://localhost:8081/nexus/content/groups/public/
3、第一步:在客户端的setting.xml中配置私服的仓库,由于setting.xml中没有repositories的配置标签需要使用profile定义仓库(profile节点内),然后把阿里镜像禁止掉
~~~html
<profile> <!--profile的id--> <id>dev</id> <repositories> <repository> <!--仓库id,repositories可以配置多个仓库,保证id不重复--> <id>nexus</id> <!--仓库地址,即nexus仓库组的地址--> <url>http://localhost:8081/nexus/content/groups/public/</url> <!--是否下载releases构件--> <releases> <enabled>true</enabled> </releases> <!--是否下载snapshots构件--> <snapshots> <enabled>true</enabled> </snapshots> </repository> </repositories> <pluginRepositories> <!-- 插件仓库,maven的运行依赖插件,也需要从私服下载插件 --> <pluginRepository> <!-- 插件仓库的id不允许重复,如果重复后边配置会覆盖前边 --> <id>public</id> <name>Public Repositories</name> <url>http://localhost:8081/nexus/content/groups/public/</url> </pluginRepository> </pluginRepositories> </profile>
~~~
使用profile定义仓库需要激活才可生效,再在profile结束标签后添加一下代码:
~~~html
<!--使用profile定义仓库需要激活才可生效--> <activeProfiles> <activeProfile>dev</activeProfile> </activeProfiles>
~~~
4、配置成功后通过eclipse查看ssm\_service工程下pom.xml的Effective POM选项,可看到如下代码:
~~~html
<repositories> <repository> <releases> <enabled>true</enabled> </releases> <snapshots> <enabled>true</enabled> </snapshots> <id>nexus</id> <url>http://localhost:8081/nexus/content/groups/public/</url> </repository> <repository> <snapshots> <enabled>false</enabled> </snapshots> <id>central</id> <name>Central Repository</name> <url>https://repo.maven.apache.org/maven2</url> </repository> </repositories> <pluginRepositories> <pluginRepository> <id>public</id> <name>Public Repositories</name> <url>http://localhost:8081/nexus/content/groups/public/</url> </pluginRepository> <pluginRepository> <releases> <updatePolicy>never</updatePolicy> </releases> <snapshots> <enabled>false</enabled> </snapshots> <id>central</id> <name>Central Repository</name> <url>https://repo.maven.apache.org/maven2</url> </pluginRepository> </pluginRepositories>
~~~
表示当该工程需要的jar在本地仓库没有时,根据这里配置的访问路径自动去maven私服下载。此时再update一下父工程,发现ssm\_service的感叹号消失(此时ssm\_dao还是close状态),说明ssm\_service工程已经在maven私服内下载了ssm\_dao.jar,同时在本地仓库也存在了该jar。
- spring
- 1.spring第一天
- 1.1 安装spring插件(spring tool suite)
- 1.2 spring概述
- 1.3 控制反转&依赖注入
- 1.4 springIOC容器
- 1.5 依赖注入的四种方式
- 1.6 配置bean的细节
- 1.7 bean之间的关系
- 1.8 bean作用域
- 1.9 补充:创建对象的几种方法
- 1源代码位置
- 2.spring第二天
- 2.1 使用外部属性文件
- 2.2 spEL
- 2.3 bean的生命周期
- 2.4 通过工厂方式配置bean
- 2.5 基于注解的方式配置bean
- 2.6 组件装配
- 2.7 静态代理
- 2.8 动态代理
- 2.9 Cglib代理
- 2源代码位置
- 3. spring第三天
- 3.1 springAOP
- 3.1.1 AOP简介
- 3.1.2 为什么使用AOP
- 3.1.3 AOP关键术语
- 3.1.4 AOP图解
- 3.1.5 springAOP实现步骤
- 3.1.6 SpringAOP实现原理:
- 3.1.7 AOP的好处
- 3.1.8 AOP在实际项目中的主要应用
- 3代码地址
- 3.1.9 纯注解版配置aop的方式
- 3.2 maven环境搭建
- 附IDEA激活码
- 4. spring第四天
- 4.1 c3p0事务
- 4.2 命令窗口事务
- 4.3 c3p0连接池设置
- 4.4 事务中的一些基本概念
- 4.5 事务的传播行为
- 4.6 自定义异常
- 4.7 spring整合Junit单元测试
- 4.8 JdbcTemplate(附源代码)
- 事务源代码
- 4.9 纯注解tx
- 4.10 基于xml配置事务
- 0. jsp页面修改编码方式
- 0.1 eclipse配置tomcat
- 0.单例模式-饱汉模式
- 0.单例模式-饥汉模式
- springMVC
- 1. springmvc第一天
- 1.1 springMVC概述
- 1.2 springmvc框架搭建及第一个应用程序
- 1.3 @RequestMapping
- 1.4 RequestMapping修饰类
- 1.5 RequestMapping精准化映射
- 1.6 Ant风格URL
- 1.7 带有占位符的url映射
- 1.8 REST风格
- 1.9 RequerstParam获取请求正文
- 2. springmvc第二天
- 2.1 优化
- 2.2 POJO绑定请求参数
- 2.3 RequestHeader获取请求报头信息
- 2.4 CookieValue获取Cookie信息
- 2.5 获取原生ServletAPI
- 2.6 ModelAndView处理模型数据
- 2.7 Map、Model、ModelMap处理模型数据
- 2.8 @SessionAttributes注解
- 2.9 @ModelAttribute无返回值方法及方法入参
- 2.10 @ModelAttribute修饰有返回值类型的方法
- 代码地址
- 3. springmvc补充
- 3-1 springmvc工作原理
- 3-2 springmvc form表单提交中文乱码
- 3-3 数据的格式化
- 3-4 自定义类型转换器
- 3-5 其他知识点
- 3-6 crud代码
- 3-7 @DateTimeFormat日期格式化
- 3-8 数据验证的概念及JSR303验证
- 3-9 Hibernate-Validator验证框架
- 3-10 Controller捕获错误消息
- 3-11 errors标签在页面中获取错误消息
- 3-12 错误消息的定制及国际化
- 3-13 自定义拦截器
- 3-14 Java代码中获取国际化信息
- 3-15 超级链接设置国际化
- 3-16 AJAX支持之@RequestBody
- mybatis
- 1. mybatis第一天
- 1. 为什么使用mybatis
- 2. 下载地址
- 3. hello
- 4. mybatis三种开发模式
- 5. 全局配属属性内容
- 6. DTD设置
- 7. Mapper中的CRUD
- 8. 8.mybatis使用主键自增
- 9. #{}中的参数处理
- 10. #{}与${}区别
- 11. 集合数据的查询
- 12 动态sql
- 12.1 if
- 12.2 choose, when, otherwise
- 12.3 trim, where, set
- 12.4 foreach
- 代码位置
- 2. mybatis第二天
- 1.封装map类型的数据
- 2. resultMap自定义封装规则
- 0代码位置
- 3. mybatis缓存机制
- ssm整合
- 1.maven
- 2.ssm基础环境搭建
- 2-1 引入项目依赖的jar包
- 2-2 引入bootstrap,jquery
- 2-3 创建项目包结构
- 2-4 编写web.xml配置文件
- 2-5 编写sping,springmvc,mybatis配置文件
- 2-6 逆向工程mbg.xml
- shiro安全框架
- 1.shiro简介
- 易购Buy商城
- 第一天
- 1.课程计划
- 2.电商行业背景
- 3.易购Buy介绍
- 4.易购Buy架构
- 5.工程搭建
- 6.工程启动和测试
- 7.ssm框架整合
- 8.整合测试
- 9.svn
- 9.1 svn服务端
- 9.2 svn客户端
- 第二天
- 1.SOA架构分析
- 2.dubbo使用方法
- 3.注册中心
- 4.工程改造
- 5.easyUI
- maven
- 1.maven介绍
- 2.idea配置maven和服务器
- 3.创建web工程
- 4.分模块构建工程
- 5. 代码位置
- 6. nexus
- Luence搜索
- 1.了解搜索技术
- 2.Lucene的基本使用
- solr
- SolrCloud